www.vintagevibesrecipes.tk

Fast and easy old-fashioned Lilac home made concentrated lemonade

onsdag 29 april 2015


I got this recipe from my aunt and with a little modifications from my grandmothers experience, it is a very diffrent, fun and fast lemonade to make! (the original recipe takes 5 days to make) It has a very special flowery taste and is a bit bitter sweet. The colour is very beautiful and makes it really pop when you serve it and will for sure give your guests an exotic and excitingly diffrent new flavour to try. I actually did this last summer with my little brother too, it's so fun that he likes to make and try diffrent things!


about me headline

Ingredients

20-30 bunches of lilacs flowers (or as many as you fit in your pot)
1 l water
1 lemon + the lemon zest
5 dl sugar
0,5 tea spoon of atamon or benzoat (preservative)
- the preservative is 1 g per litre water


Shake the flowers and loosen them from their stem so all bugs run away. Put them in a pot or similar, pour boiling water over them and boil for 10 minutes. Remove the flowers and filtrate the water. Add the juice of 1 lemon, the lemon zest, sugar and the preservative, dissolve it in the water. Let cool and fill up your bottle and you are done!

You can of course use this recipe as a base and add other kinds of edible flowers.

Southerners cinnamon soda recipe

tisdag 28 april 2015


My little brother was very enthusiastic today and had borrowed this book from the library and wanted  to make some soda lemonade so we went to the supermarket and got ourselves some apple must and pomegranate. This recipe is from the book "Soda lemonad & snacks" by Tove Nilsson.

about me headline
Imagesource

Ingredients

1 pomegranate
1 1/2 dl sugar
1 bottle (6 dl) of apple juice/must
4,5 teaspoons of cinnamon
1,5 tablespoon dried hibiscus flowers
1 1/2 teaspoon of lemon juice

Take out the fruit pulps of the pomegranate. Melt the sugar until brown (not burned) then withdraw from heat. Add the apple juice slowly! The hot sugar will cause the water to pop. Careful not to burn yourself. The sugar will harden, dissolve with a spoon. Add hibiscus, lemon juice and cinnamon. Boil on low heat with lid for 30 min, stir in the beginning until all sugar is dissolved. Sieve the liquid. Fill up in a glass bottle, let cool. Serve cold with crushed ice.

This recipe is very sweet so you can use less sugar. Once there is apple season you can make your own apple juice to add to this lemonade.


Chilli marinated crawfish salad recipe

måndag 27 april 2015


I actually saw this on TV but with lobster, I only used my favourite part from the recipe and switched it to crawfish instead. The original recipe if you are intrested in making a lobster ravioli with butter and caper sauce it can be found here


about me headline
Imagesource

1 package of crawfish that you chop roughly
1 bunch of chopped parsley
1 bunch of chopped dill
1-2 pressed cloves of garlic
1/2 red neatly chopped chilli
50 g melted salted butter
A squeeze of fresh lemon juice

Fry the chilli in the melted butter that you will salt, avoid chilli come in contact with your skin, it burns! Mix everything togheter and serve. This is perfect as an appertizer or combined with other small dishes.

If you tried it please let me know what you think!

Easy oat & honey baguette recipe


I got this recipe from my mother, she does it everytime we have friends and family over for dinner. It is originally from one of her cook books and the recipe is called "Annas havrebaguetter" wich can somewhat be translated to Anna's oat baguettes". It is a very delicious bread and you can easily make the preparations around 3 hours before the guest arrives. 


about me headline
Imagesource

Ingredients

260 C 15 min, 150 C 15 min

1/2 package of yeast
2 teaspoon of salt
1 tablespoon honey
6 dl of lukewarm water
2 1/2 dl of fiber oat (gyllenhammar)
10 dl whey flour

crush the yeast, add salt and honey and dissolve it with a little bit of the 37 C water. Add rest of the water. Add the oat then the rest of the flour. work the dough togheter and cover the bowl with a baking cloth and let prove for 1-2 hours. pour out the dough, don't knead it or you will ruin the air bubbles. Cut the dough in 4 pices with a baking scrape or similar. shape them into baguettes as long as your oven plate is and twist them in a spiral pattern and put a little flour on top of them. put them one by one on the oven plate paper on your oven plate and shove them into the oven. Start at 260 C for 15 min, then when the bell rings lower temperature to 150C for another 15 min and then they are done!

Please let me know what you think if you tried it!

Turkish Çörek/Cörek filled bread recipe


This is a recipe that my mother in law teached me when I was in Turkey wich I have modified a bit regarding the fillings but the priciple is the same. The turks makes these very thin and round, a skilled woman as my mother in law is, she can tuck four peices of bread at the same time with a small rolling pin without them getting stuck togheter. The image above shows them a bit light since I tried to bake them in the stone oven at the same time as we did "mjukkaka" right after my parents had done pizza so the oven was too hot and it was the end of the day so no one had the patients to wait for the oven to cool down a bit. It is better to fry them in a pan or shove them in your oven until they are golden brown and crispy.


about me headline
Imagesource


Ingredients

250 C 15-20 min until golden brown

4 dl of whey flour
2 1 ml mesuring spoon salt
3 table spoons oil
1 dl kefir
1 dl warm water

  Filling

250 g of minced meat (cow or moose)
2 pcs of garlic
2 pinches of pul biber (can be replaced with a little chili flakes)
2 pinches of köfte spice
1 pinch of salt
4 large potatoes
2 teaspoons of strong red bell pepper paste
1 package of Feta cheese laid in oil
Parsley

Tips! - in Turkish red bell pepper paste is called Salça. A good option is hot pepper paste by Sera, you can usually find it in the foreign section of the store. Otherwise visit your closest oriental supermarket.


Filling

Peel and cook the potatoes in boiling water for 10-20 min. If you chop them roughly they will be ready faster. Remove the water, squash the potato once they are soft. Wash and cop parsley, add it to the mashed potatoe while it is still hot. 

Fry minced meat in a pan with oil until almost golden. Add 2 pcs of pressed garlic, 1 pinch of salt, 2 small spoons of red bell pepper paste, 2 pinches of pul biber and 2 pinches of köfte spice. Add more spices if you want to until reached desired taste.

Make your own feta cheese oil mix to keep in the fridge. Use feta cheese, thyme, garlic, french herbs, oregano and basil togheter with olive oil. Or purchase one from the store. 

Mix the spicy meat, the potatoes and a little feta cheese mixture and your filling is done. You can of course use the fillings separatly if you want many diffrent flavourings like the Turks do or just use one of them. I personally like to mix everything togheter.

Dough

Mix the dry ingredients then add kefir and warm water. The dough is now very loose. Add whey flour to your liking, do not use to much in to the dough since you will use much more flour when you tuck them to prevent them from sticking to the table. The dough should be quite loose but firm. Flatten the bread with a rolling pin. If you are in a hurry make 4-5 flat breads, if you have time to make them thin and many you can make 15 peices out of the same amount of dough. Add the filling, close it and use a fork to seal the edges in a neat way. 

You can always change the filling. The bread will be crisp and should be in the oven 250C for around 15-20 min. They are ready when they are golden brown.
Please let me know what you think if you tried it! 


Swedish traditional stone oven baked "Mjukkaka" recipe


In sweden we like to bake lots of bread a few times a year in a house called "bagarstuga" it is practically a house with a big stone oven. The whole family and friends comes togheter to help with the baking. It is very fun and sweaty! Usually in sweden there is a local association, guild or club that will rent their oven to you in case you do not know someone with acess to a bakery house with a stone oven. Don't fall into despair if you don't have a stone oven, it can be done perfectly as well at home in your own regular oven.


I will give you a recipe of a small batch to make at home, and a big one to make in a "Bagarstuga".

The smaller batch is a local  recipe I got from a small town in northern Sweden called Jokkmokk


about me headline
Ingredients for small batch at home

Oven is 275 C 3-4 min, 2 breads per oven plate

5 dl luke warm milk
50 g of butter
1 package of yeast
3 table spoons of syurup
1 teaspoon of salt
4 dl sifted rye flour
6 dl whey flour
3 1 ml mesuring spoon anis or fennel seeds

Melt the butter, add the milk. It should be 37 C, finger warm. Dissolve the yeast and then add syrup.
Mix the dry ingredients, pour into the liquid. Knead the dough until it is loose but still firm, like a belly. Add more flour if you need to.
Tips! - If you add too much flour the dough will be too tough and hard to tuck and make flat.


prove the dought under baking cloth for 45 min. Divide the dough into 8 peices. Make each peice the size of a standard plate and 1/2 cm thick with a rolling pin. Pricker them with a pricker rolling-pin.
Tips!- If you don't have a pricker rolling-pin you can use a fork to make the holes.
Put the breads in the oven 275 C 3-4 min, two bread will fit on each oven plate. 


Ingredients for a big batch to use in a bagarstuga with stone oven

2 litre milk
350 g butter
2 package of yeast
1/2 bottle of syrup
3 teaspoons of salt
2 table spoon of anis or fennel seeds
2 kg whey flour
10 dl of sifted rye flour
5 dl fibre oatmeal

- the amount of flour should be approximatly 6 kg wich is around 3 standard packages of flour. You can swich in diffrent kind of flour depending on you own preference of taste.


Tips! - when you bake in a stone oven you can spin the bread 1-2 times to prevent them from finishing unevenly since the oven is hotter the further in you get. The priciple behind baking is the same as above. The two other tool you need is one big bakers peel to shove them in and out of the oven and a slimmer one to rotate the bread. If you rent a "Bagarstuga" it should have all the neccesary equipment. Usually wood is not free of charge so you need to bring a batch of your own. You always pre heat the oven and fire it up really hot before baking. When it's time to start to bake you scrape the wood away further in to the sides with a special iron tool and use a wet a birch besom to sweep clean the stone tiles inside the oven from coal and hot glowing smoulder pices.

Classic gluten free luxury cookies recipe


This is a classic very luxury cookie recipe, wich originates from the "urban legend Marcus Neiman 250 dollar cookie recipe" wich I have modified a bit. I made this togheter with my little brother for my sisters birthday.


about me headline
Imagesource

Ingredients

Oven is 190 C for 10 min

150 g butter or 1,5 dl liquid butter & rape seed oil
2 eggs

1,5 dl sugar
1,5 dl dark brown sugar
1 ml mesuring spoon salt
1 tea spoon vanilla sugar
2 tea spoons baking powder
3 dl almond flour
6 dl fiber oatmeal

300-400 g of gluten free sweets (we used 1,5 200 g marabou milk chocolate)

Tips! - Gyllenhammar fiber oatmeal is excellent to use since it is already deflocculated. If you don't have it you can use regular oatmeal, just run it trough your mixer to make it finley divided.
- If you don't want it gluten free just switch the almond flour to regular wheat flour, it will make the cookies crispier.
- If you want milk free, just switch to your favourite gluten and milk free sweets and add it to your cake mixture. Try dark chocolate for example. Instead of butter use a milk free margarine/vegetal butter of your preference.


Mix all the dry ingredients togheter in a bowl. Add the liquid oilbutter and eggs. Stir. Continue mixing togheter with your hands. Chop quite chunky bits of the cocolate. Add it to your cookie mixture. Make small round balls and flatten them with your hand. if the mixture starts to stick too much to your hands, scrape them off and wash them with water, then continue. Put on a oven plate with baking paper 190 C for 10 min. They will float out a bit but not that much. They will be soft once out of the oven and harden a bit more when they cool. 

Enjoy your delicious gluten free cookies.
Please let me know what you think if you tried it!

The best easy gluten and milk free white cake recipe

fredag 24 april 2015


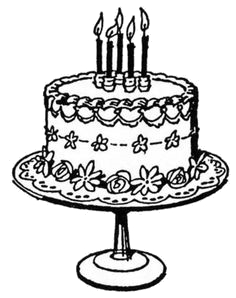
This recipe is not like any other gluten and milk free cake recipe, it is very easy and you do not need many ingredients to make this delicious cake. Therefore you will not need a miles long shopping list! as they say, "anything of genious is simple". You probably have most of the ingredients already at home. This cake is not dry and it will certainly not be flat or compact. It is fluffy so it is easy to cut in two, wich will give you two nice layers to work with. This recipe is made up by me and my grandmother when we decided to bake a gluten and milk free cake to my cousins birthday as a present. I did a lot of research and togheter with my sweet grandmothers experience we hit the jackpot.


about me headline
Imagesource

Ingredients

Oven is 200 C for 30 min

Cake mixture: 

1 dl Almond flour
1 dl Potato flour (potato starch)
3 teaspoon Maizena flour (corn starch)
2 teaspoon baking powder
3 large or 4 standard sized eggs (by large eggs i mean those that have two eggyolks)
2 dl sugar

Filling & decoration: 

2 dl Crushed raspberries mixed with 1 dl sugar
2 package of oat or soy based cream that can be whipped.
1/2 teaspoon instant coffe mixed with a touch of hot water
cacaco powder
Vanilla sugar
Blackberries
Sugar


Tips! - We used Go green visp 1 package for the filling and 1 package alpro soya airy & creamy for decoration on the outside of the cake. The Go green one is a bit thicker and perfect for filling, the alpro soya one is more fluffy and airy (it rises more when you whip it) wich makes it more suitable for decoration. Either one is fine it is just a matter of preference.

Mix the dry ingredients almond-, potato- and maizena flour and baking powder togheter in a bowl. 

In another bowl whip sugar and eggs togheter really fluffy, you need to whip it for atleast 3-5 minutes (this step is important). 

Tips! - stir the dry ingredients slowly togheter with the egg and sugar mixture, don't stir to hard since it can take the airyness out of your cake mixture and make it flatter/sink in when you put it in the oven. 

When you are done pour cake mixture in a round prepared cake oven proof form approximatley 22 cm in diameter and 7 cm high 200 C for 30 min.

Tips! - The cake form need to be properly prepared with oil and lots of almond flour in it to prevent cake from sticking to the form. Improperly done form will ruin your cake wich makes it brake when you try to take it loose. To ensure your cake is whole, let it cool for 5-10 min before you take it from the form and loosen the edges with a knife. If it does not come loose, try the "wet cold cloth trick" and leave it on the outside bottom of the form for a while, then try again. This cake can be frozen onced cooled and used for later.

For the filling whip 1 package of the go green cream for a long time. Add flavours to your layers. We added 4 teaspoons vanilla sugar, 3 teaspoons of sugar and 1 teaspoon instant coffe with a touch of hot water (to make it dissolve) and cocoa powder for the first layer. Add as much cocoa powder that you see fit. 

The second layer the base is the same (so save some of that chocolate-coffe go green whipped cream) and add 2 dl of crushed raspberries togheter with 1 dl sugar and mix togheter. 

You can make any filling you like with diffrent berries or other flavours.

To decorate the outside we whipped 1 package alpro soya then added flavouring; 4 teaspoons vanilla sugar and 3 teaspoons sugar. Use a spritzer if you like to make a proper vintage vibe feeling to your cake. Then add frozen blackberries for decoration for a clean spring touch. In summertime you can use fresh strawberries.


Tips! - Remeber to decorate the cake the same day as the cake is supposed to be eaten, otherwise the berries can melt and "bleed out" on your gorgeous white cream.

Please let me know what you think if you tried it!